Walkthrough: View Metrics and Build the Global Model
After a federated training run finishes, the platform can collect training metrics and generated model artifacts from the participating clinic nodes. These results help you evaluate whether the training behaved as expected and whether the resulting model should be stored as a reusable trained model.
A completed federated run can therefore produce two kinds of follow-up information:
| Result type | Meaning |
|---|---|
| Local metrics | Performance metrics computed at participating clinic nodes, for example accuracy, AUC, precision, recall, or loss |
| Training result artifacts | Files produced by the trainable app, for example a trained model file such as model.joblib |
| Model variant | A stored model version created from the training result artifact |
| Build pipeline | A validation and packaging pipeline that prepares the model artifact for reuse |
Metric sharing is not automatic. Participating clinics can review and approve the request before their local metrics are shared with the global server.
Step 1 — Request Local Metrics
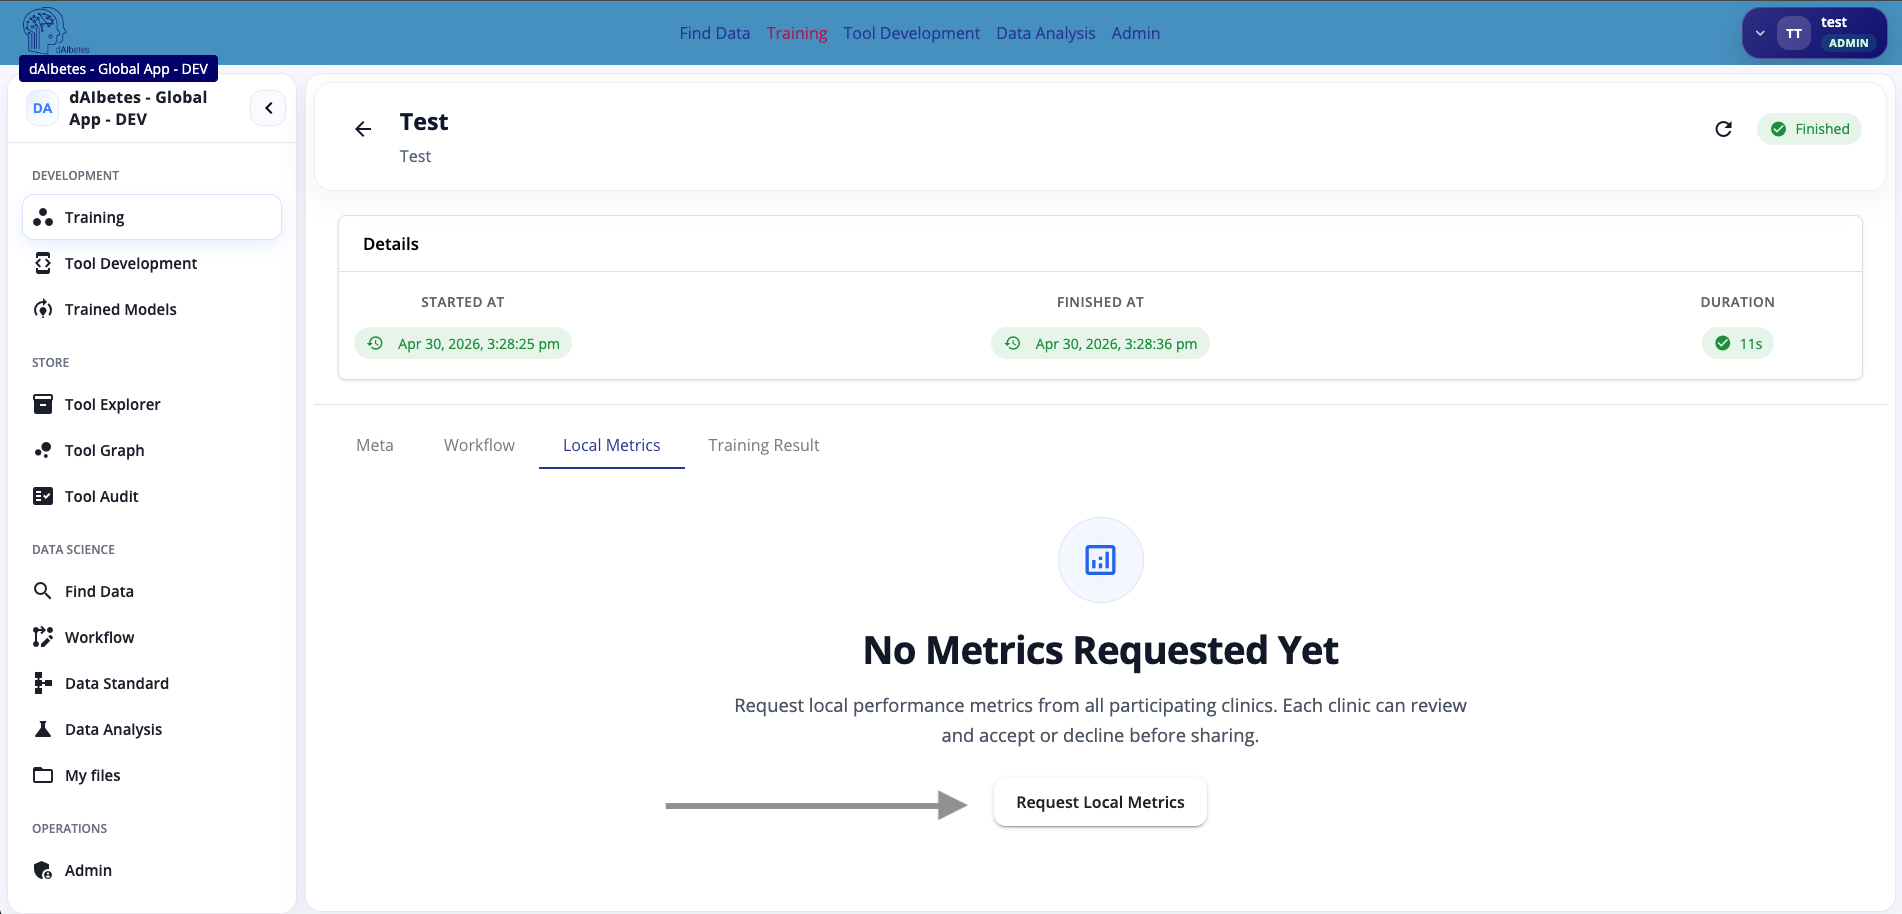
Open the completed training run and switch to the Local Metrics tab.
If no metrics have been requested yet, the page shows an empty state. Click Request Local Metrics.
A confirmation dialog explains what will be requested from the participating clinics.
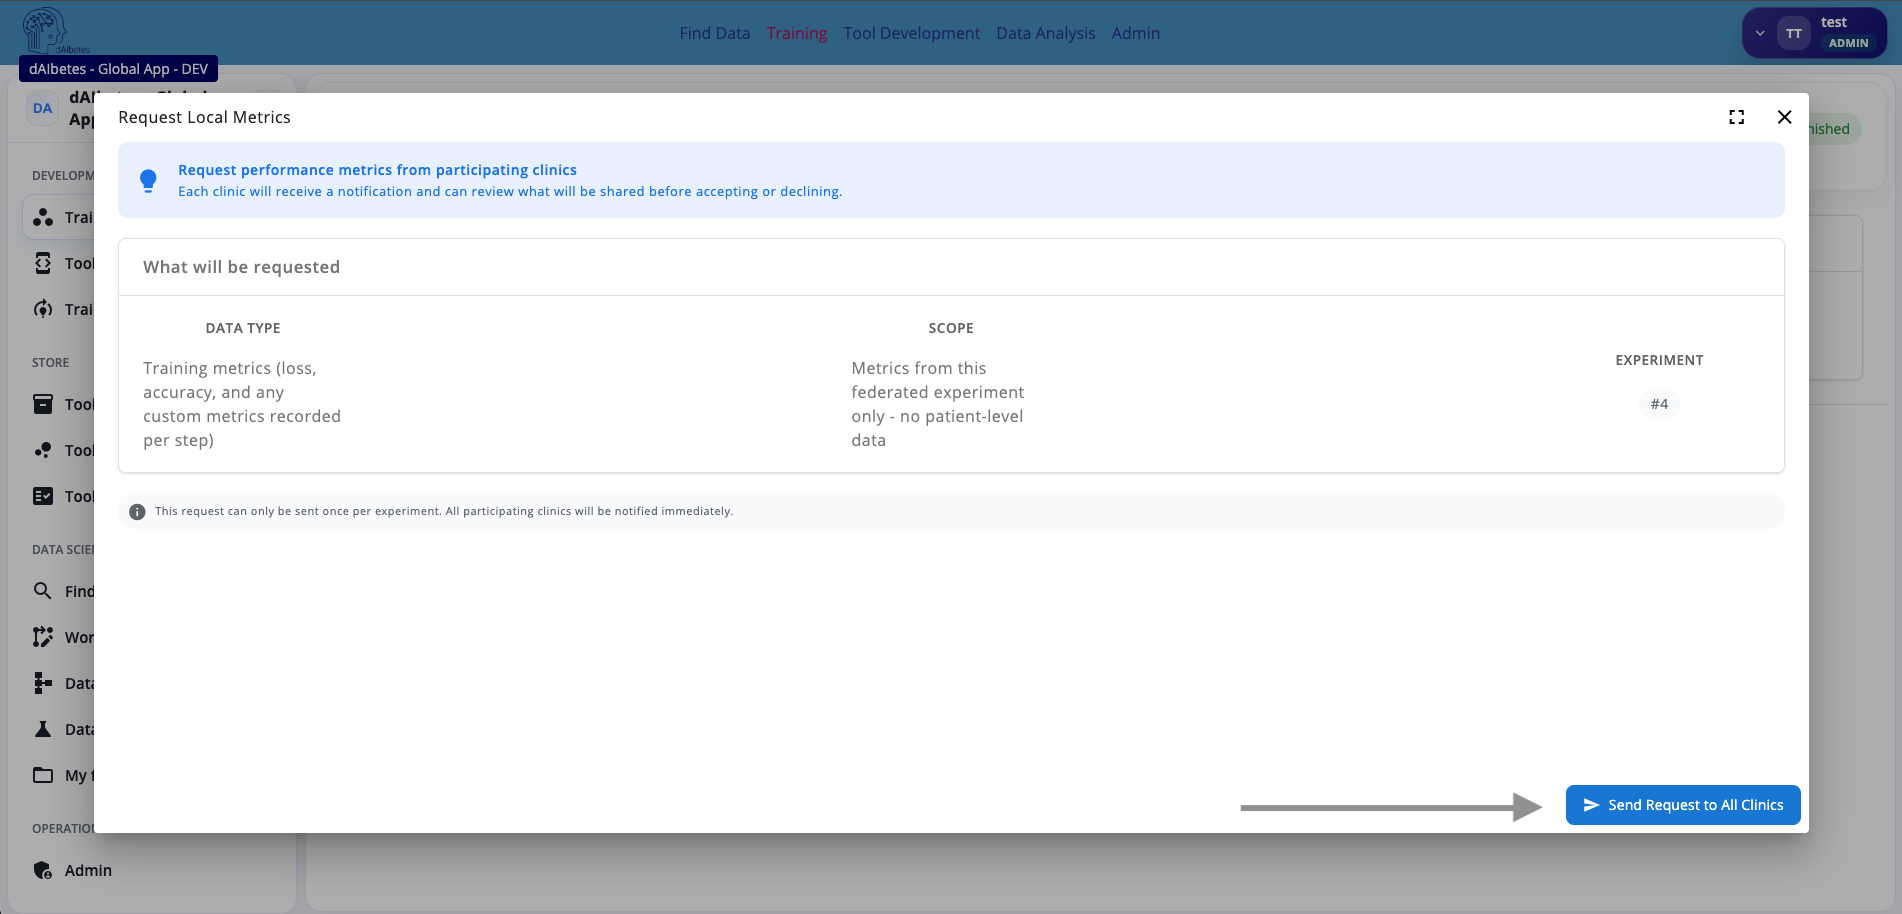
The request includes training metrics such as loss, accuracy, AUC, and any custom metrics recorded by the app during training. The scope is limited to the federated experiment. No patient-level data is requested.
Click Send Request to All Clinics to notify the participating clinics.
Local metrics must be accepted by the local clinic before they become visible on the global server. This gives each clinic control over whether performance information from its local data may be shared.
Metrics are useful for evaluating the model, but they are still derived from local clinic data. For that reason, the platform treats metric sharing as an explicit request-and-approval process.
Step 2 — Review Aggregated and Per-Clinic Metrics
After clinics approve the metrics request, the Local Metrics tab shows the received responses.
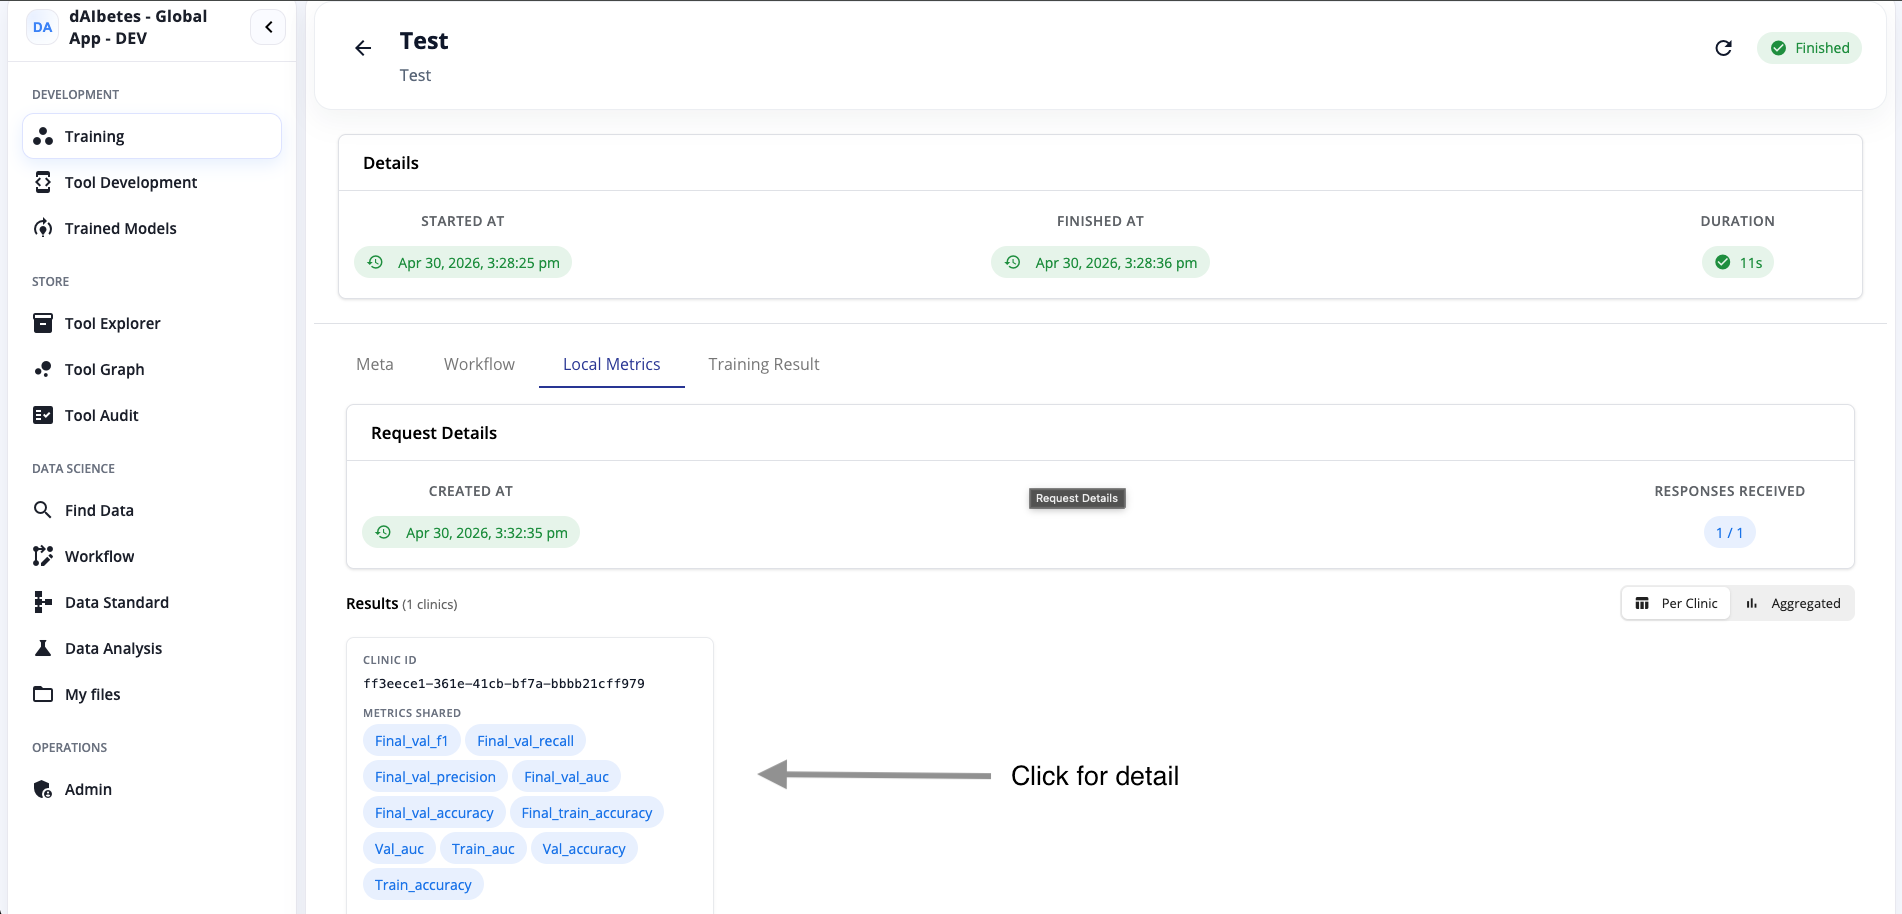
The request details show when the metric request was created and how many clinic responses were received. The results area lists each responding clinic and the metric names that were shared.
You can inspect metrics in two views:
| View | Meaning |
|---|---|
| Per Clinic | Shows metrics grouped by clinic response |
| Aggregated | Shows averaged metrics across responding clinics |
Click a clinic result card to open the detailed metric charts.
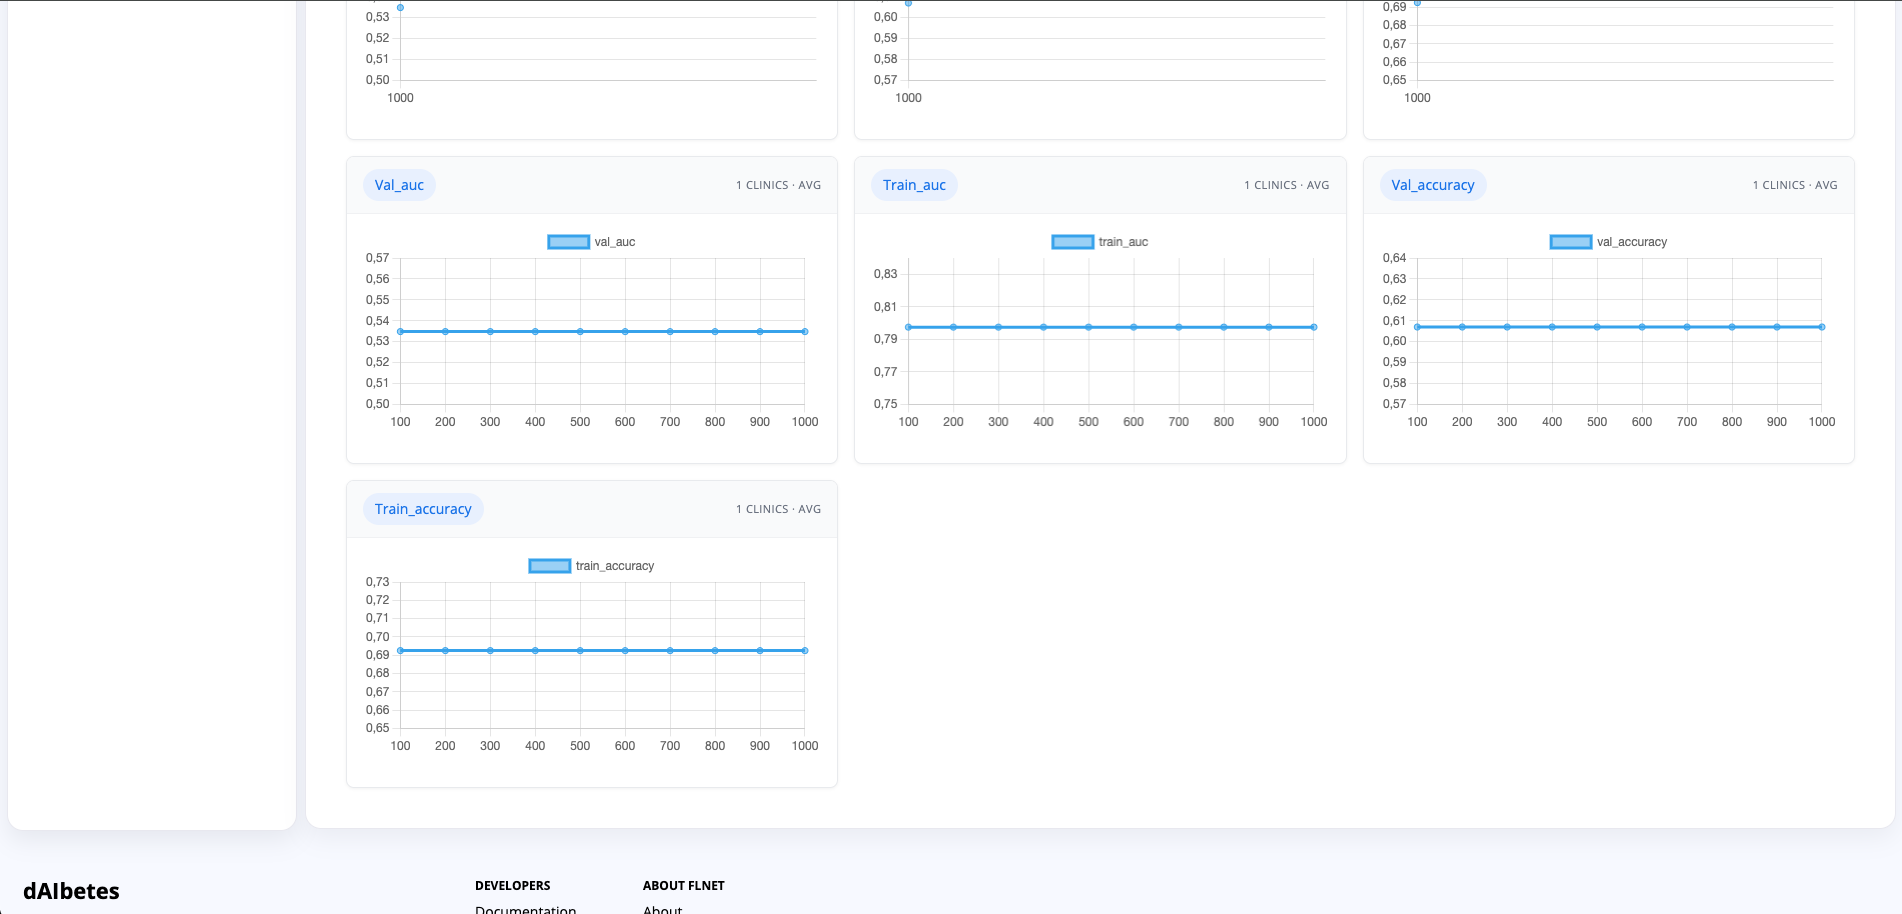
Each chart corresponds to one metric reported by the app. Examples include:
| Metric | Meaning |
|---|---|
train_accuracy | Accuracy on the local training split |
val_accuracy | Accuracy on the local validation split |
train_auc | AUC on the local training split |
val_auc | AUC on the local validation split |
final_val_precision | Final precision on the validation split |
final_val_recall | Final recall on the validation split |
final_val_f1 | Final F1 score on the validation split |
final_val_auc | Final AUC score on the validation split |
The X-axis usually represents the reported step, round, or sample index used by the app when emitting metrics. The Y-axis shows the metric value.
The metric charts reflect values reported by the tool implementation. Their meaning depends on how the app calls its metric-reporting function during training.
Use metrics to check whether training behaved plausibly. Compare training and validation metrics: a large gap can indicate overfitting, while very low or flat values can indicate a data, label, or configuration problem.
Step 3 — Review Training Result Artifacts
Open the Training Result tab.
If the workflow produced trainable artifacts, they are shown here. If no trainable tools were added to the workflow, the page shows an empty state. In a correctly configured trainable workflow, you can open the trained model artifact from this section.
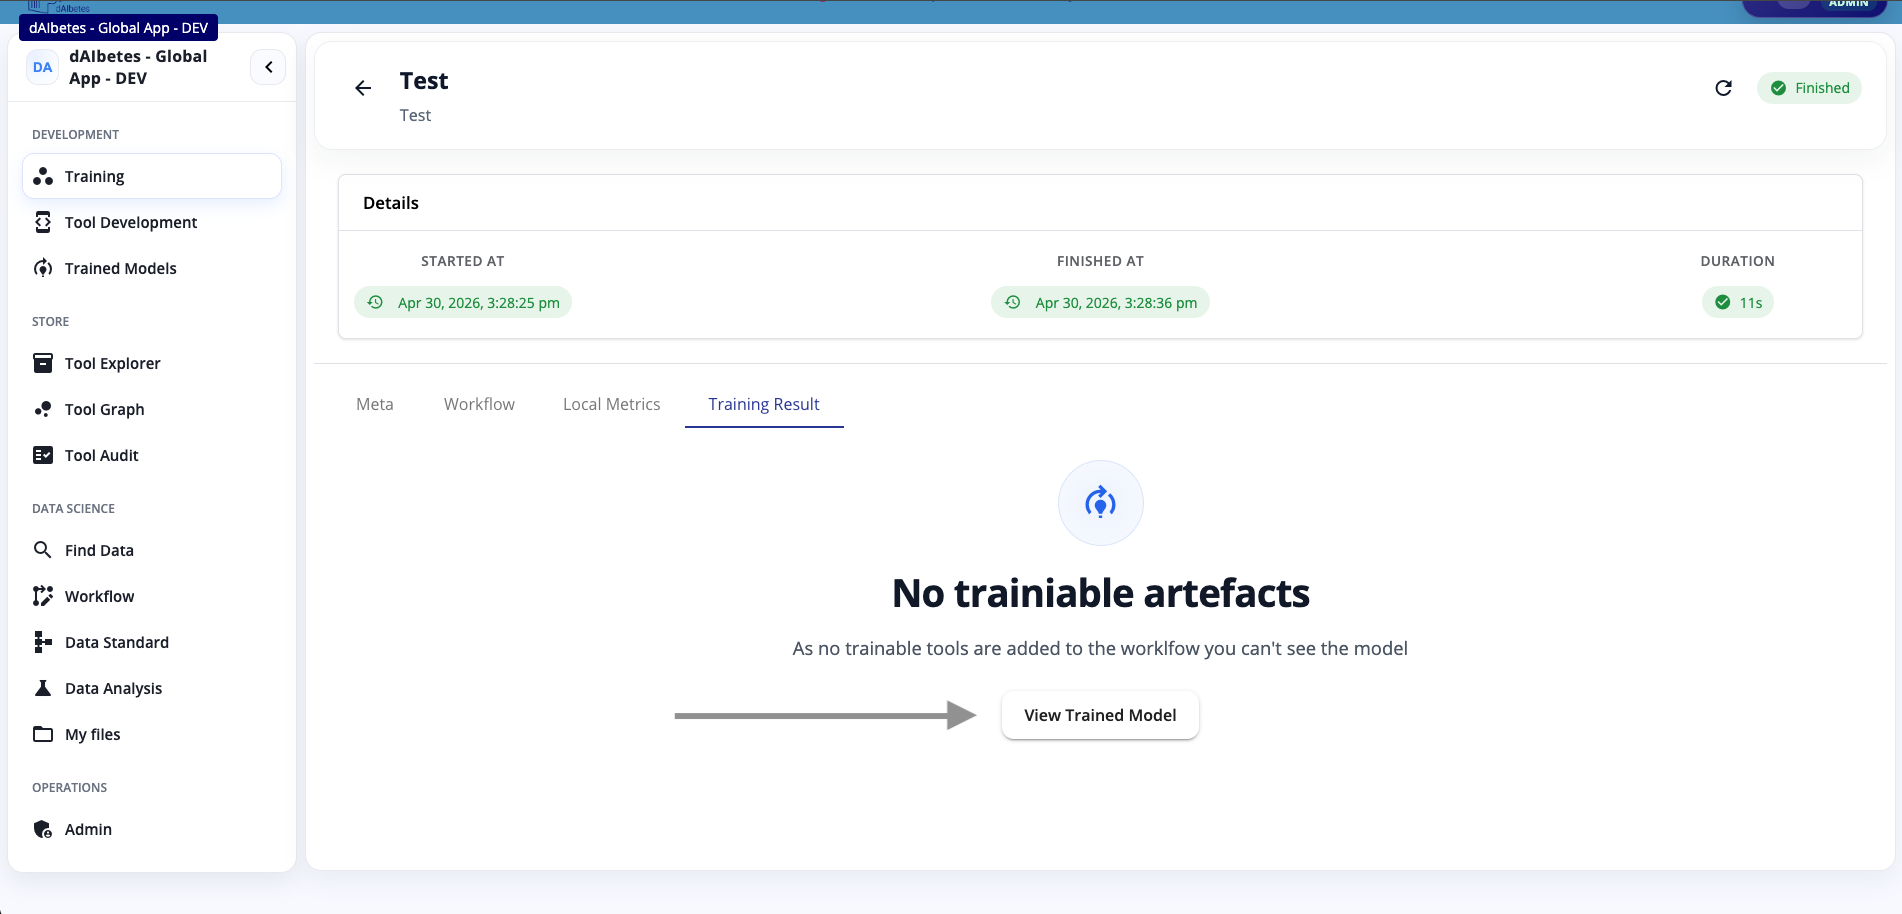
Click View Trained Model or open the available training artifact to inspect the model result.
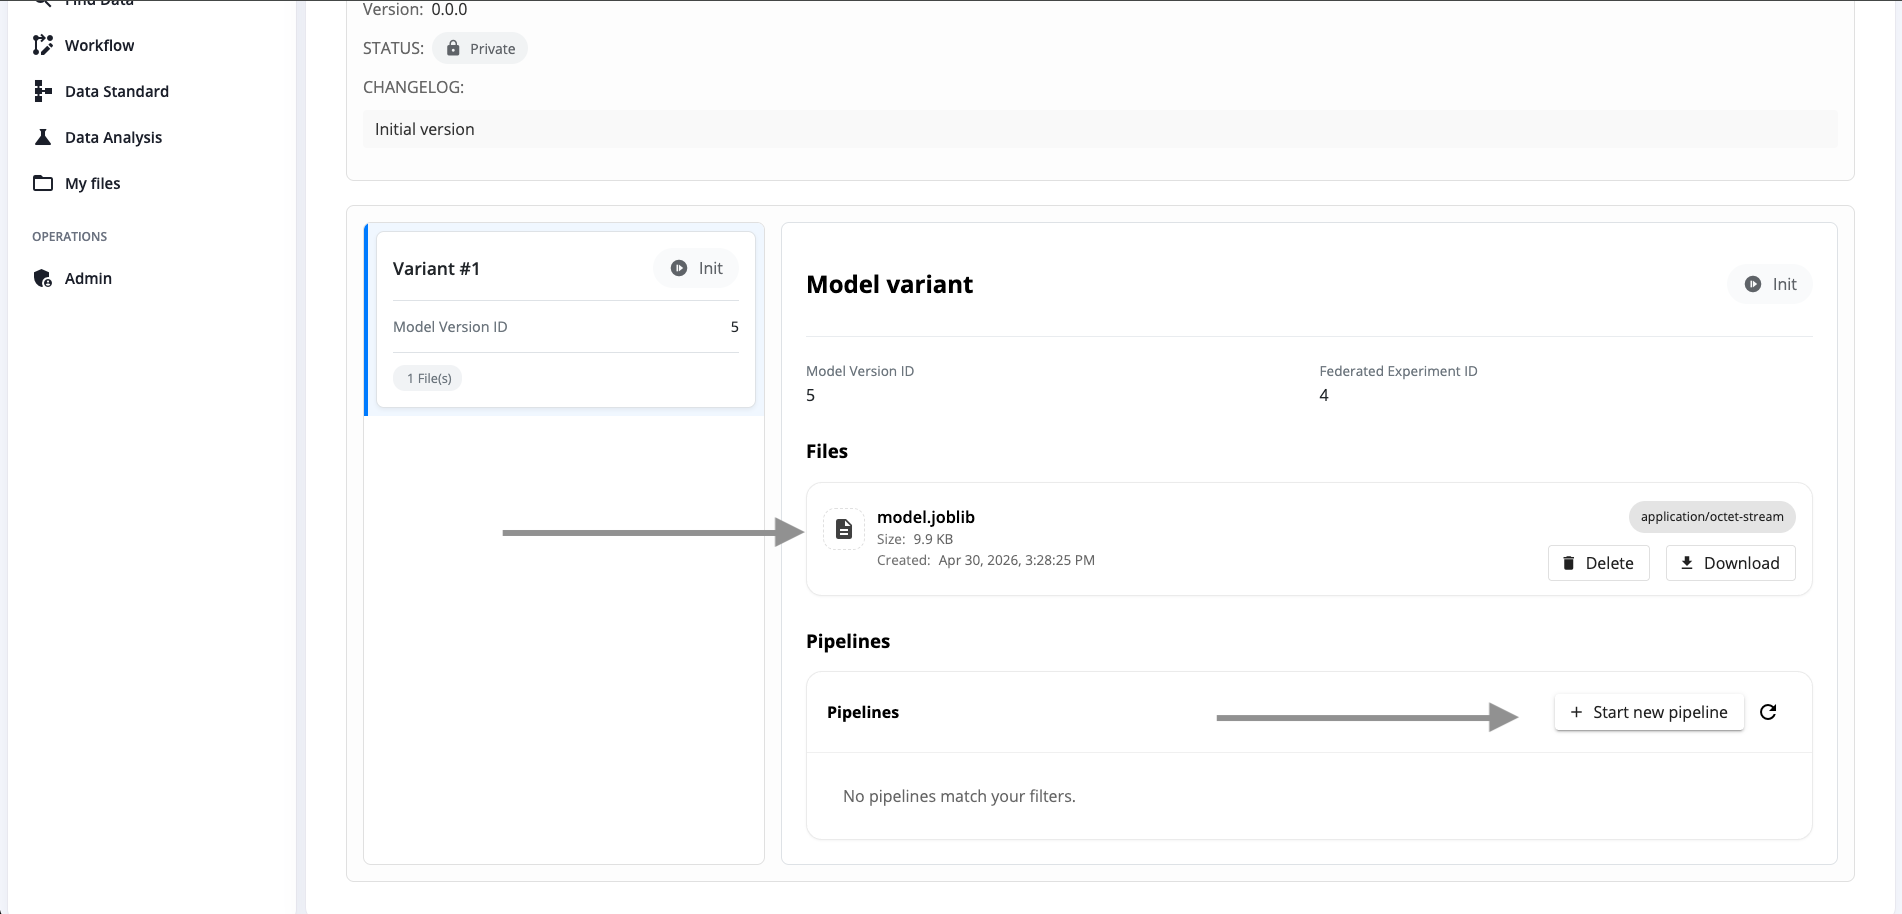
The model result page shows the generated model variant and the files produced by the federated experiment. In the
example, the result contains a model.joblib file.
The file can be downloaded, but it can also be used to create a managed trained model inside the platform.
The training result is the output of the federated experiment. It is not yet necessarily a validated, packaged, and reusable platform model.
First inspect the generated artifact, then decide whether it should become a reusable trained model variant.
Step 4 — Build and Validate the Global Model Artifact
From the model variant page, you can start a pipeline for the generated model artifact.
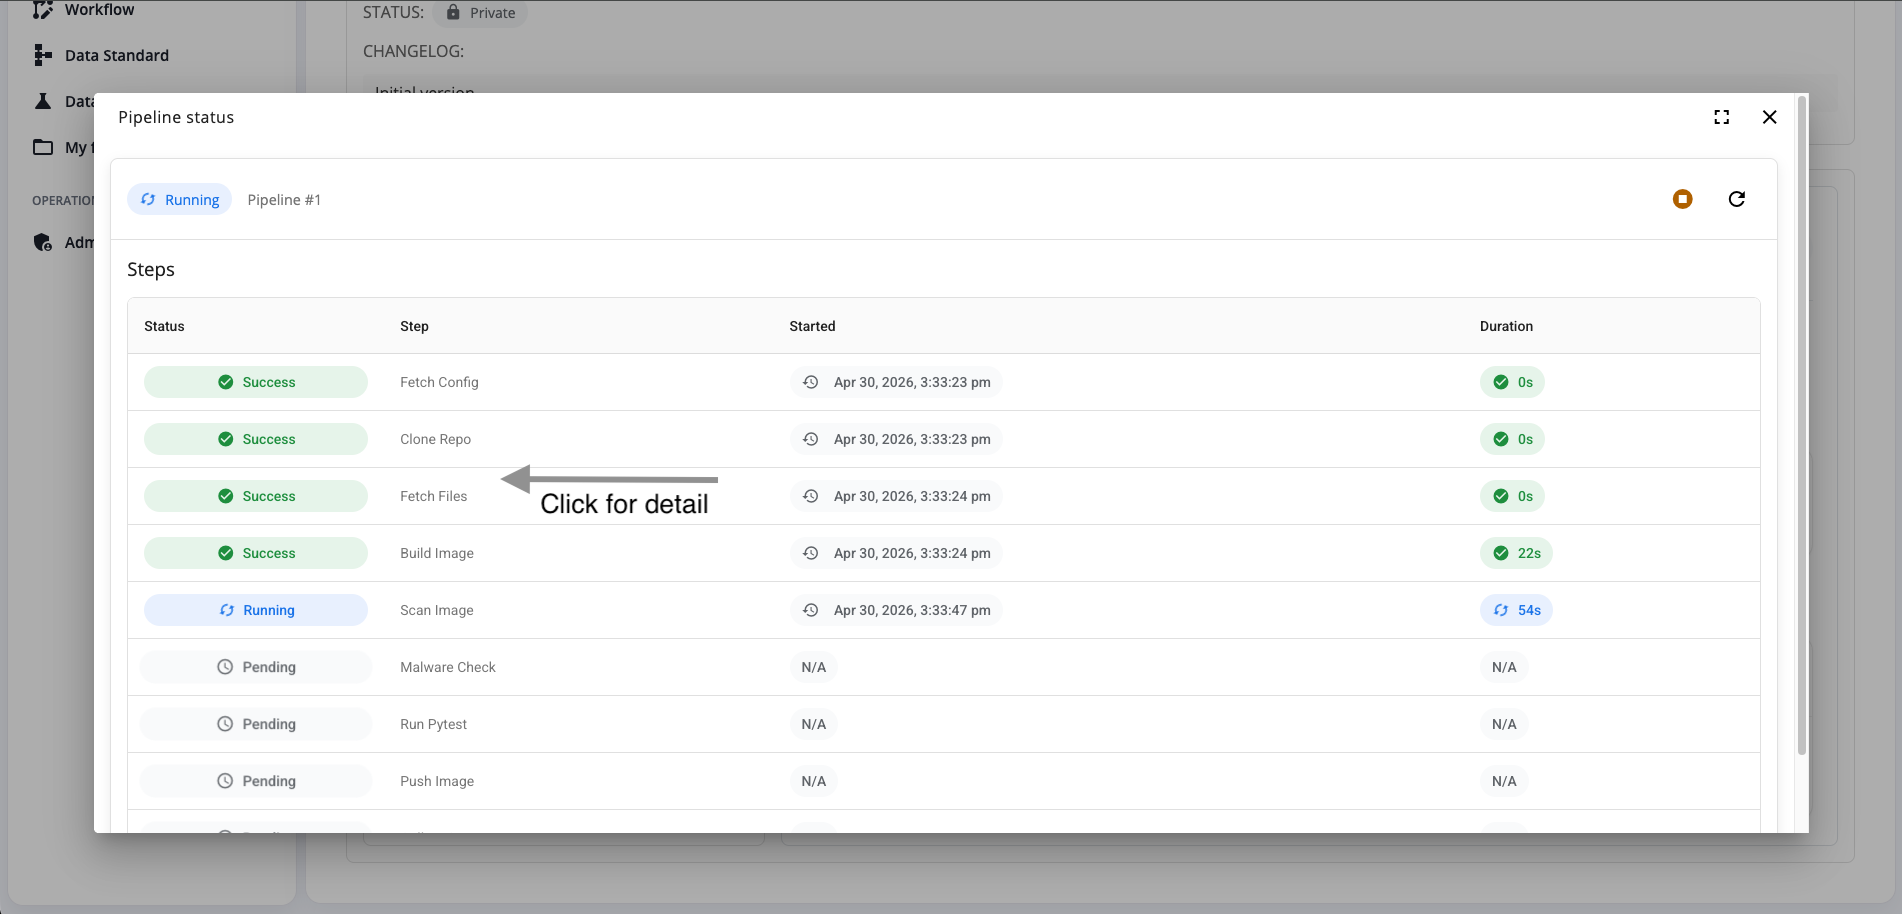
Click Start new pipeline to begin the model build and validation process.
The pipeline executes several controlled steps. These may include fetching configuration, cloning or preparing the repository, fetching files, building the image, scanning the image, checking for malware, running tests, pushing the image, and collecting a summary.
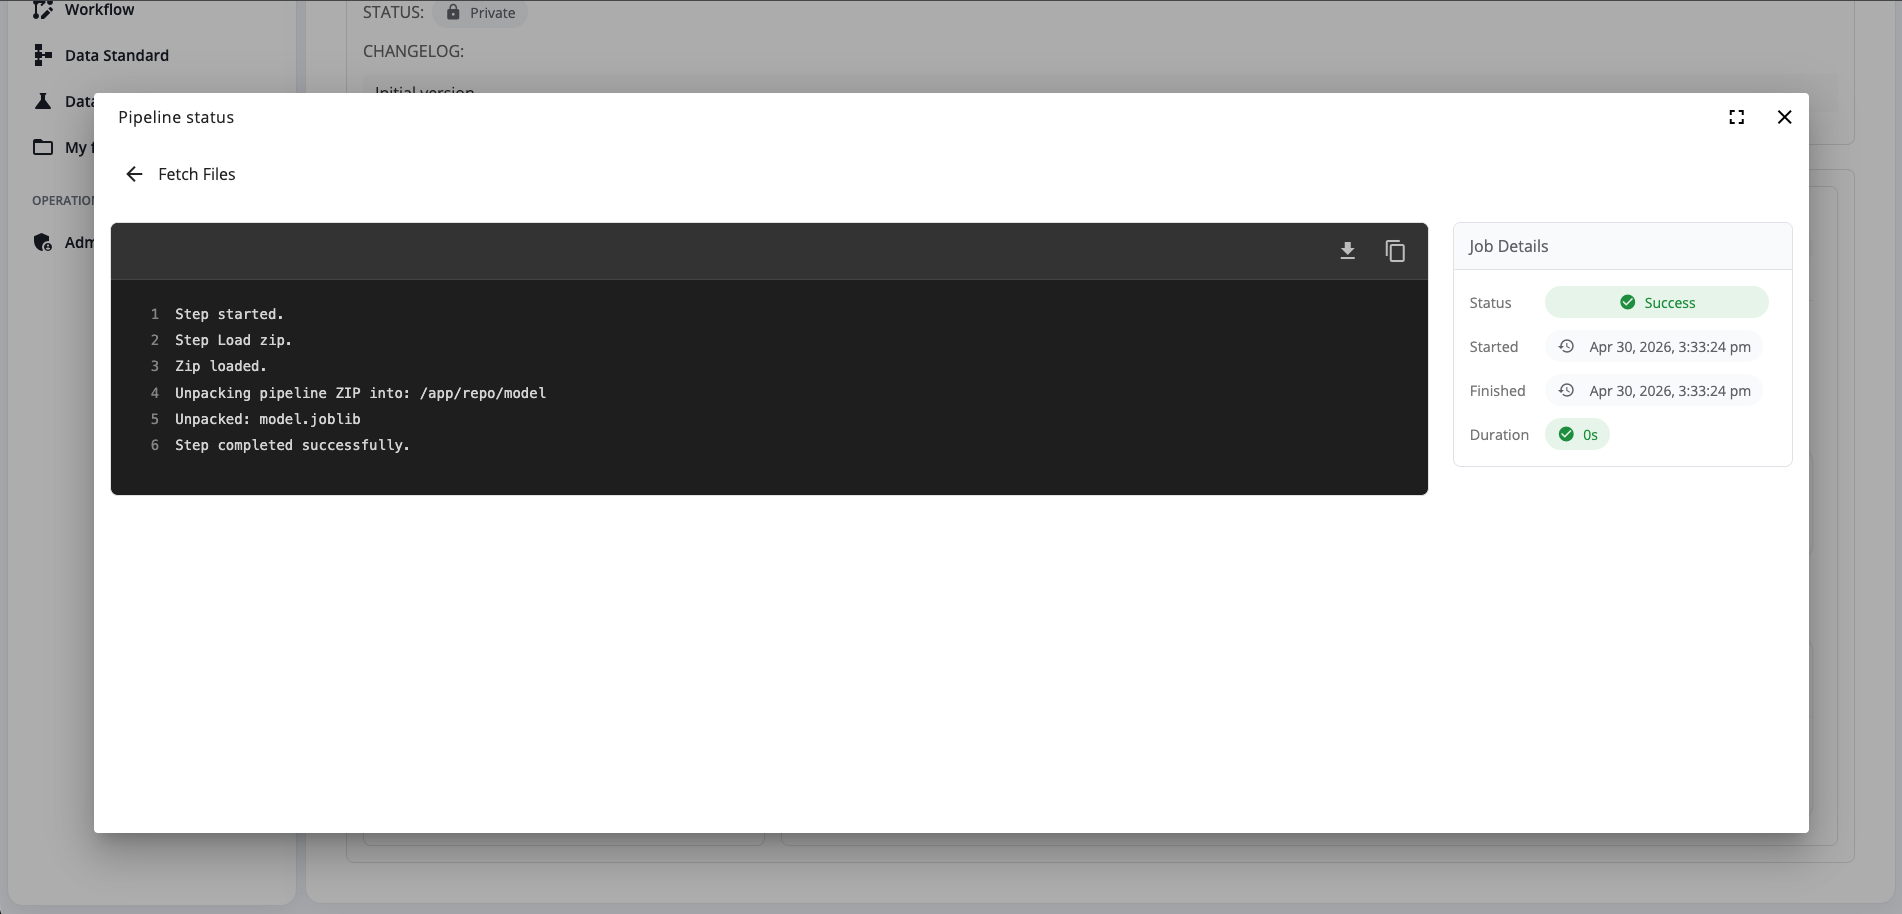
You can click a pipeline step to open the detailed step log.
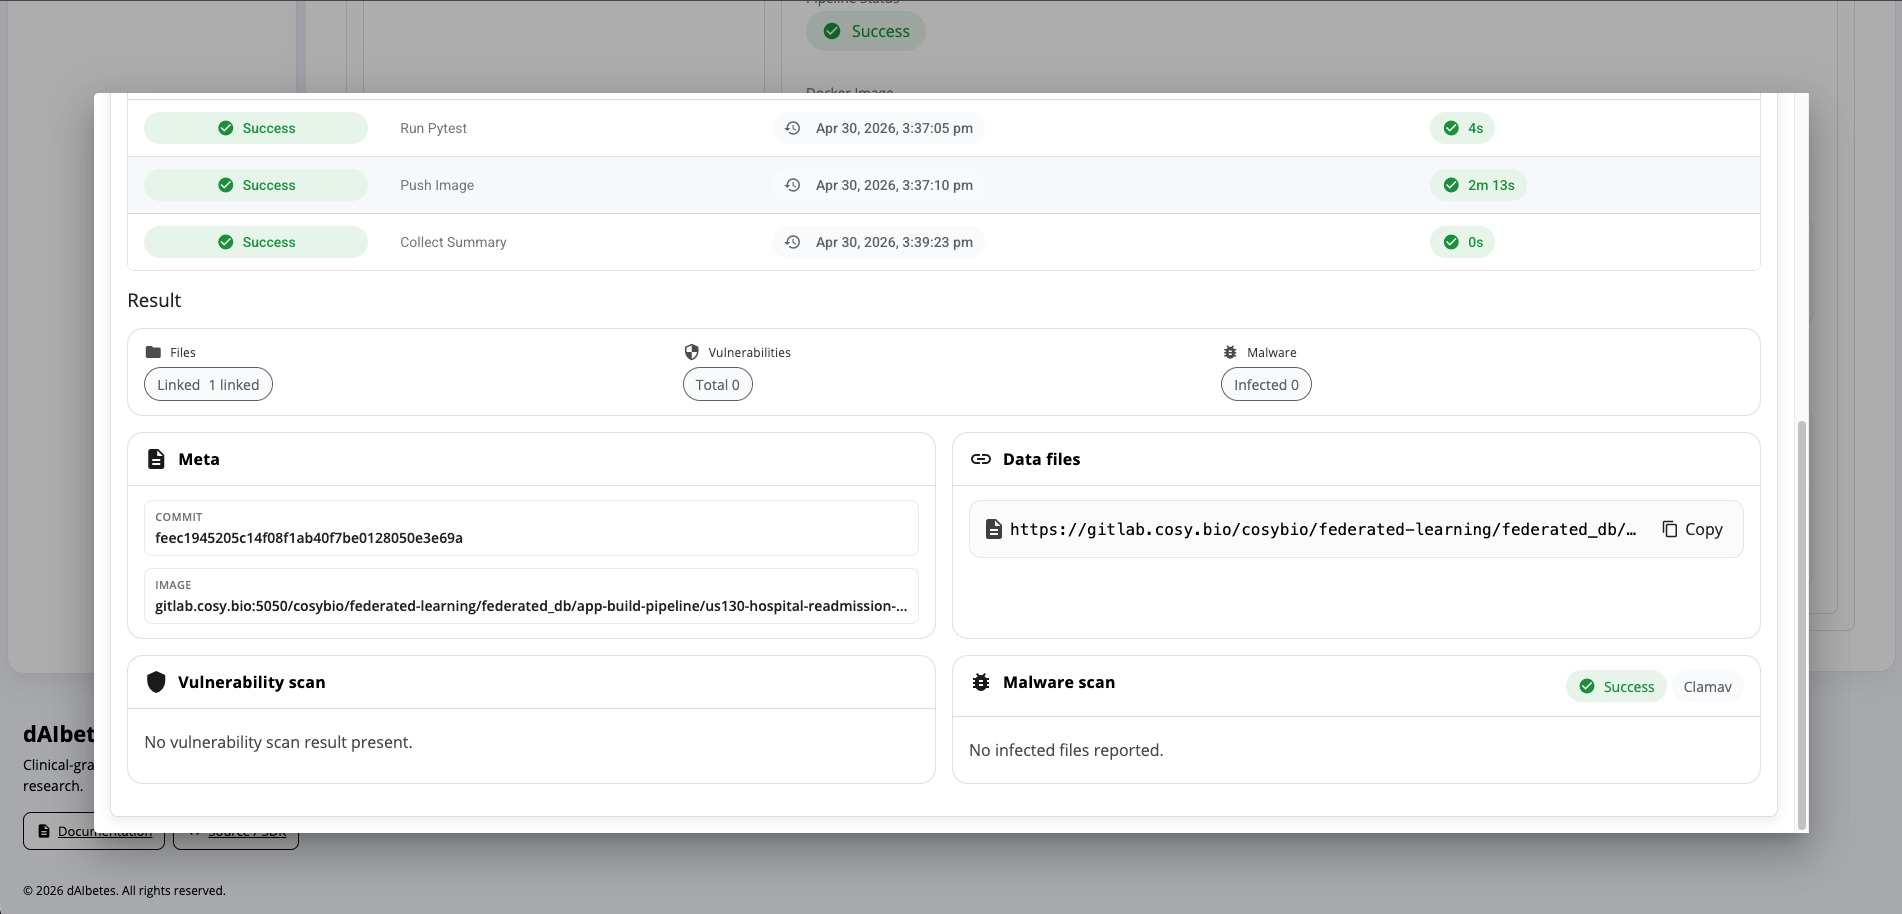
The step detail view shows the log output and job metadata. In the example, the Fetch Files step loads the model
artifact ZIP, unpacks it, and confirms that model.joblib was extracted successfully.
When the pipeline finishes, the model variant shows a successful pipeline status and the built Docker image reference.
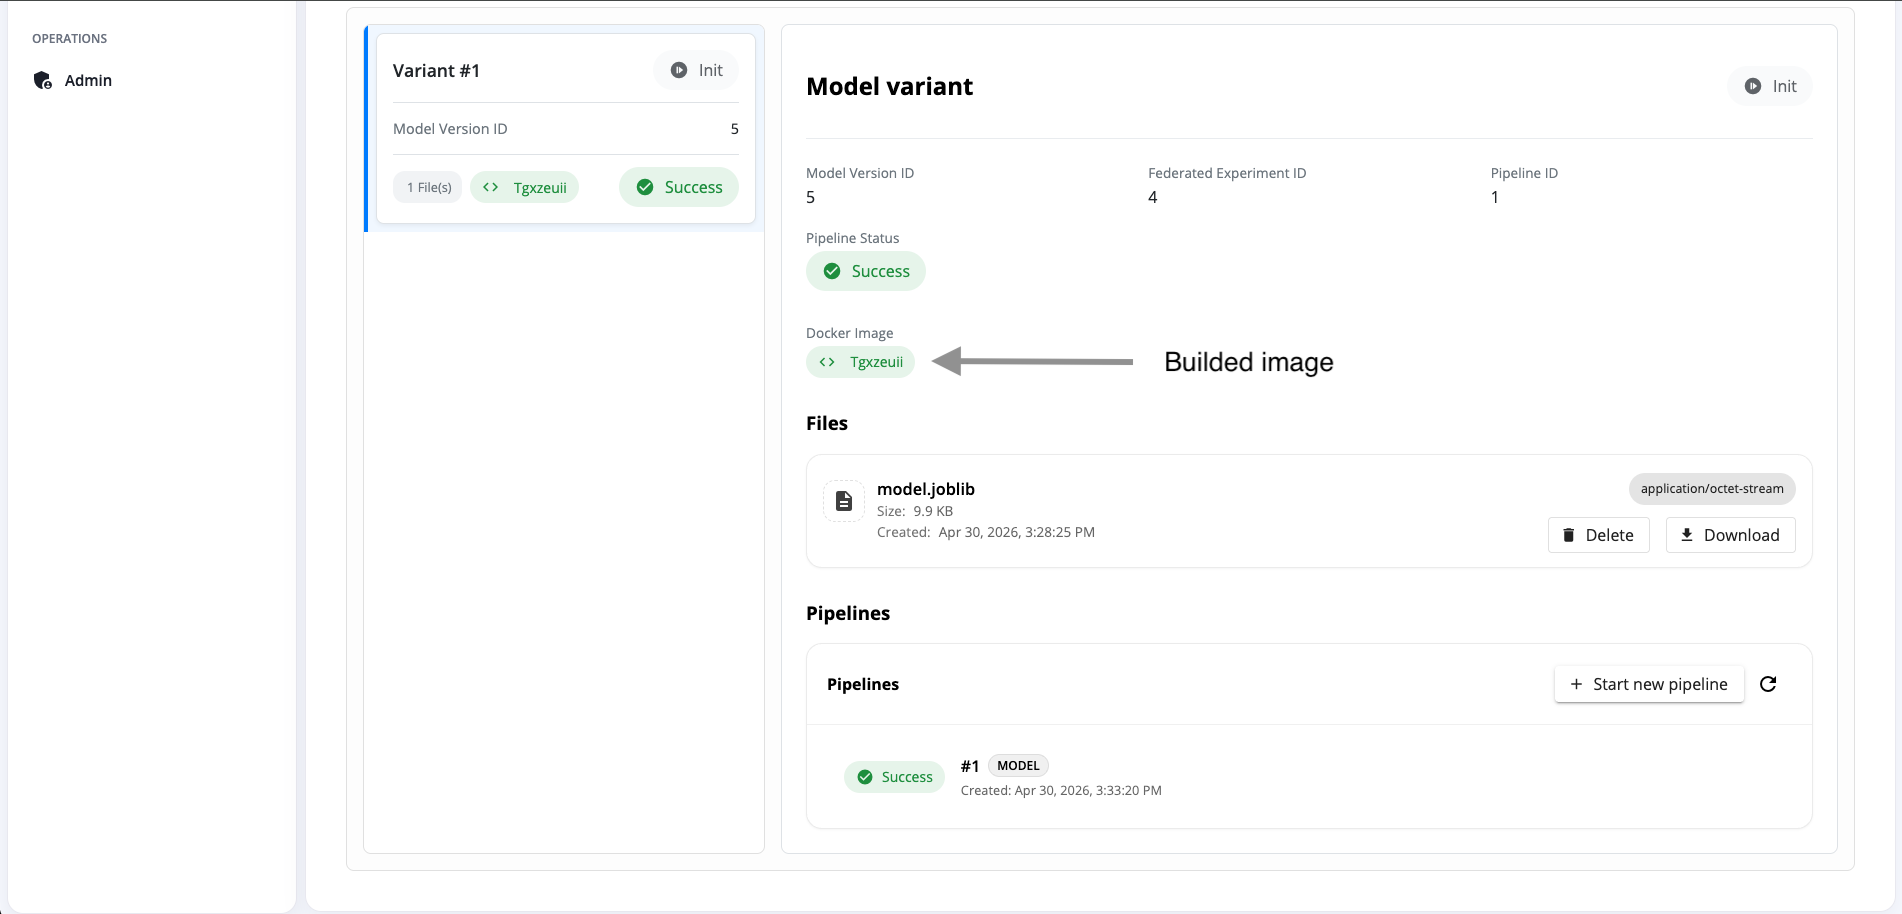
The success view shows:
| Field | Meaning |
|---|---|
| Model Version ID | Internal version of the trained model |
| Federated Experiment ID | The experiment that produced the model |
| Pipeline ID | The build pipeline that validated and packaged the model |
| Pipeline Status | Whether the model build pipeline succeeded |
| Docker Image | The built image reference used for later execution |
| Files | Model artifact files, such as model.joblib |
| Pipelines | Pipeline runs associated with the model variant |
The model build pipeline is a validation and packaging step. It makes the trained artifact reproducible and executable through the platform rather than leaving it as an unmanaged file.
A successful training run produces a model artifact. A successful model pipeline turns that artifact into a managed, validated model variant that can be reused later.
Step 5 — Create and Review the Trained Model Entry
After the training result artifact has been created, open the Training Result tab of the completed run and click View Trained Model.
If the training result has not yet been registered as a trained model, the platform opens the model creation view.
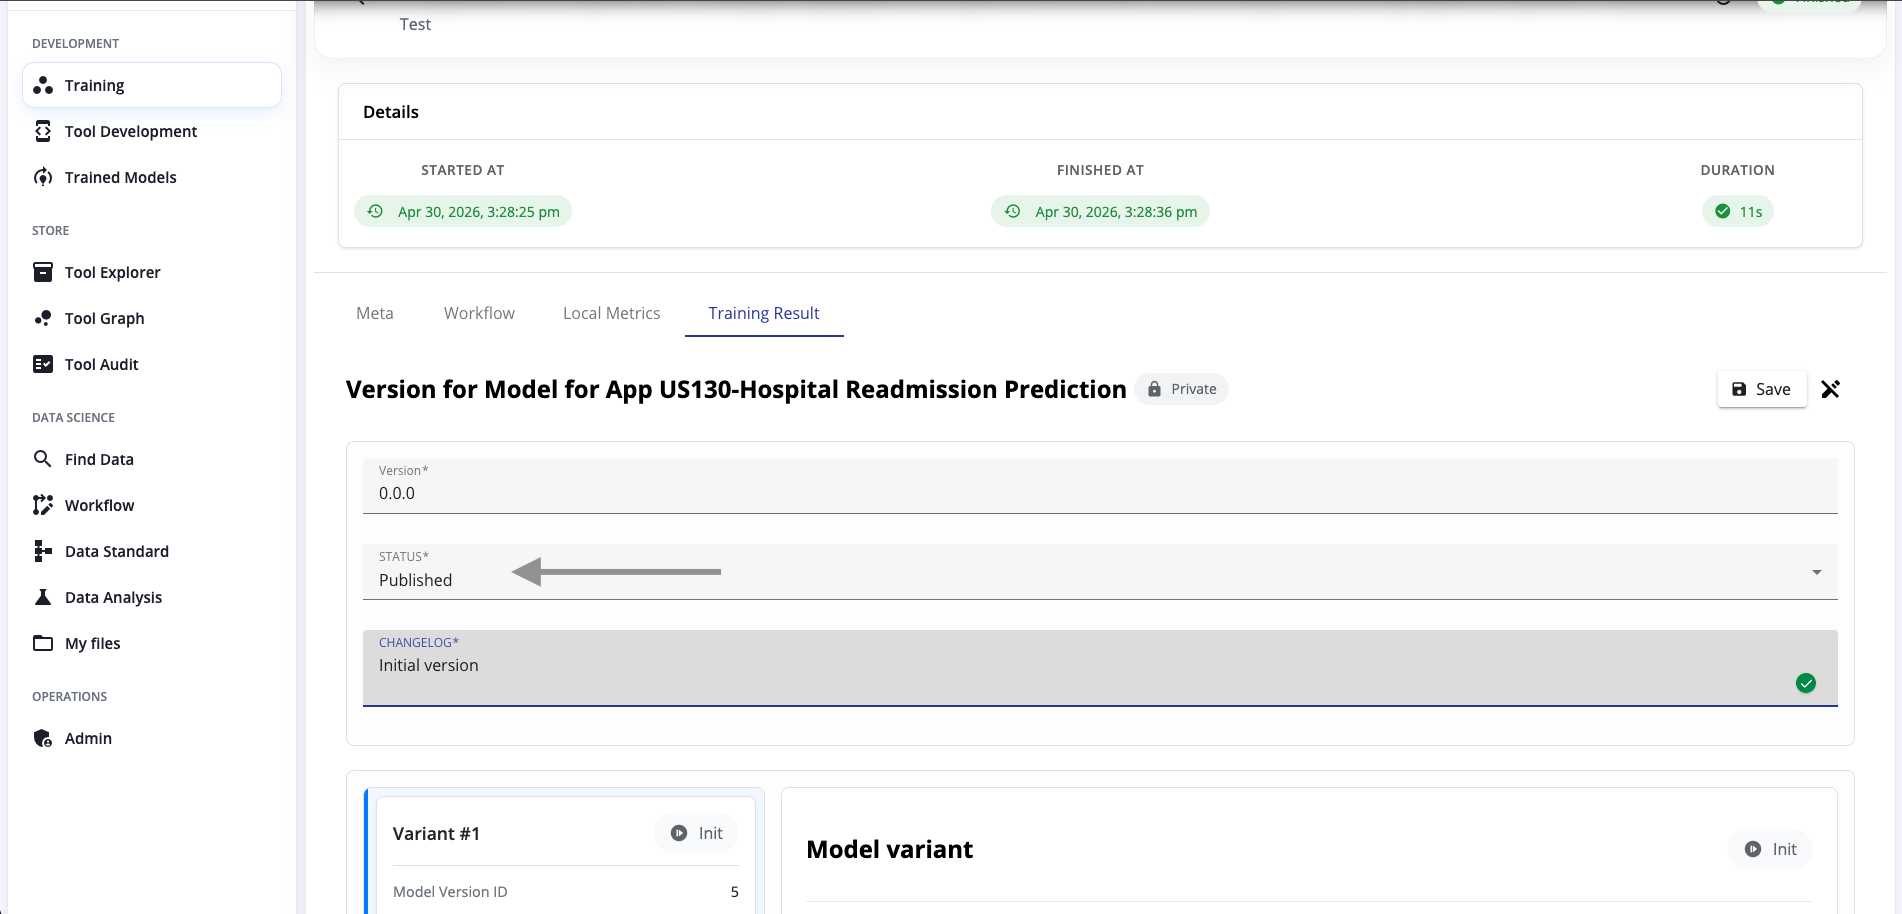
In this view, you define the metadata for the trained model.
| Field | Description |
|---|---|
| Name | Human-readable model name shown in the trained model registry |
| Short Description | Brief summary of the model |
| Long Description | More detailed explanation of the model, training context, intended use, and limitations |
| Version | Initial model version, for example 0.0.0 |
| Latest Changes | Changelog text for this model version |
| Publish Status | Visibility of the trained model, for example private, restricted, or published |
Click Save to create the trained model entry.
The trained model entry is metadata around the model artifact. It makes the result easier to find, describe, govern, and reuse later.
Use a meaningful model name and description. A trained model may later be reused in prediction workflows, so its training context should remain understandable.
Step 6 — Configure the Model Version
After saving the model entry, the model version view is shown inside the run result.
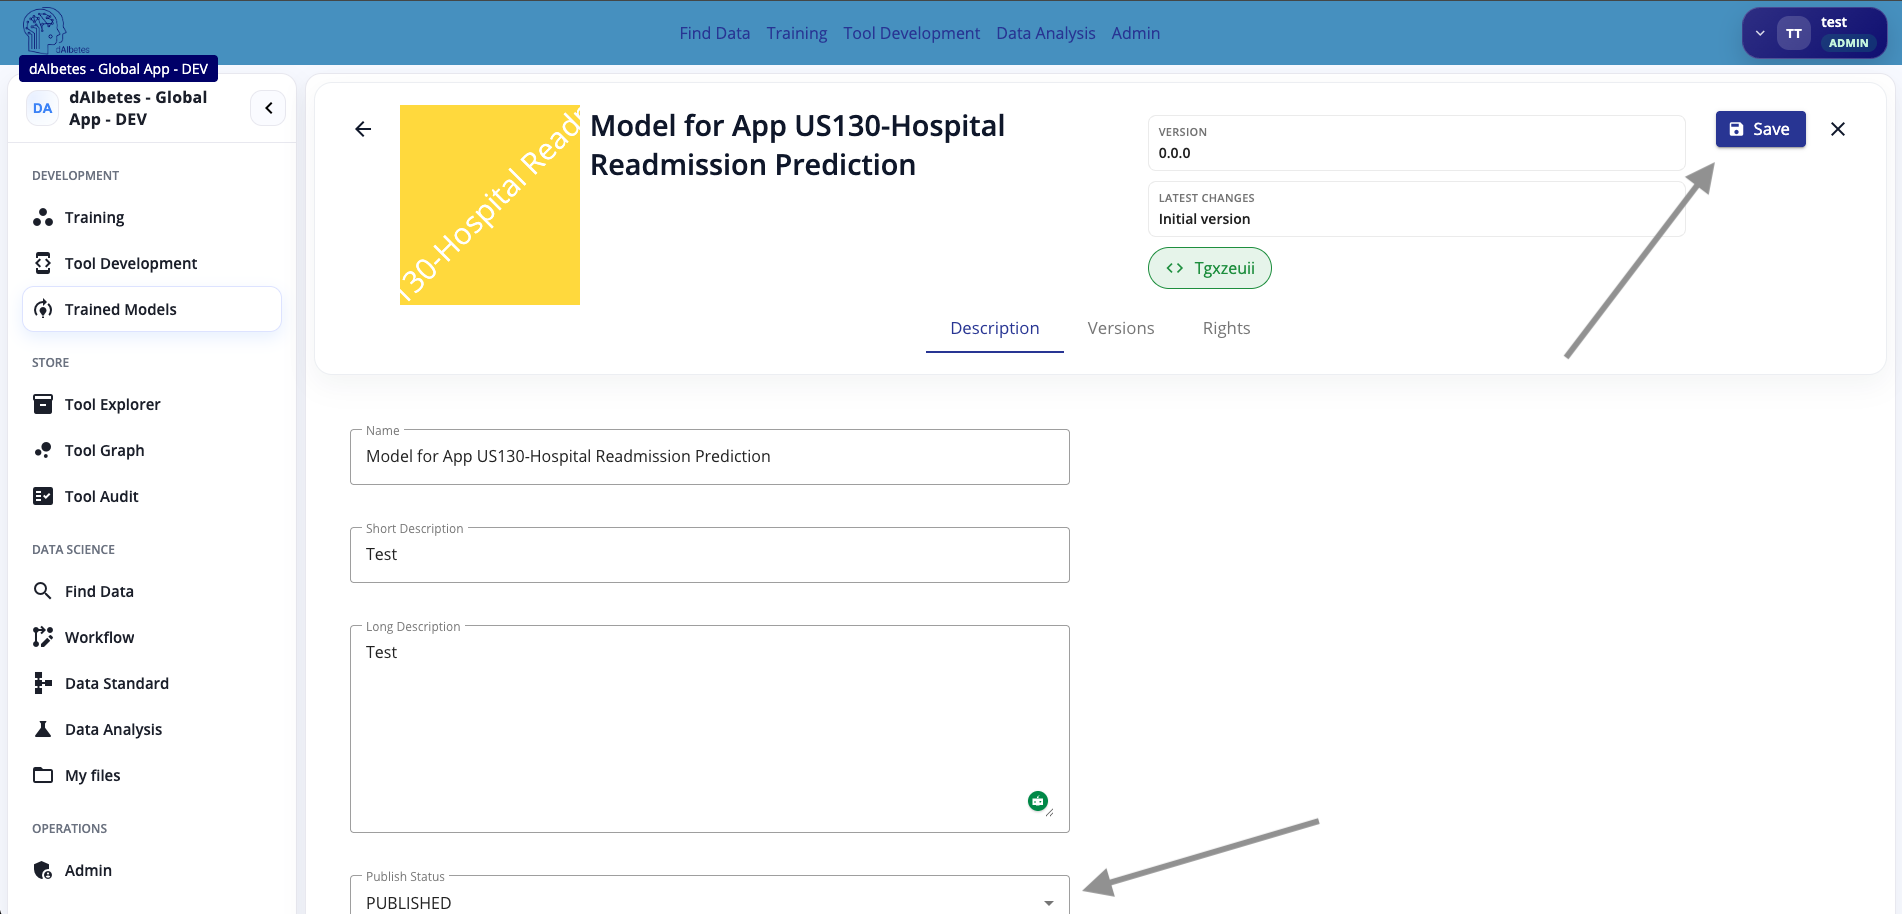
Here you can review or edit the version metadata.
| Field | Description |
|---|---|
| Version | Version label of the trained model artifact |
| Status | Publication state of this model version |
| Changelog | Description of what changed or how this model version was created |
| Variant | Concrete model artifact variant generated from the federated experiment |
| Model Version ID | Internal identifier of this model version |
| Files | Files attached to the model version, for example model.joblib |
| Pipeline status | Validation and packaging status of the model artifact |
Set the status according to the intended use. For a first internal test, keep the model private. Use Published only if the model should be visible and reusable according to your project policy.
Click Save after updating the version metadata.
Model metadata and model artifact validation are separate concerns. The metadata describes the model, while the pipeline validates and packages the artifact.
Treat model versioning like software versioning. Each meaningful change in training data, workflow, hyperparameters, or model artifact should be reflected in the version description.
Step 7 — Open the Trained Model Registry
You can access all trained models from the global navigation via Trained Models.
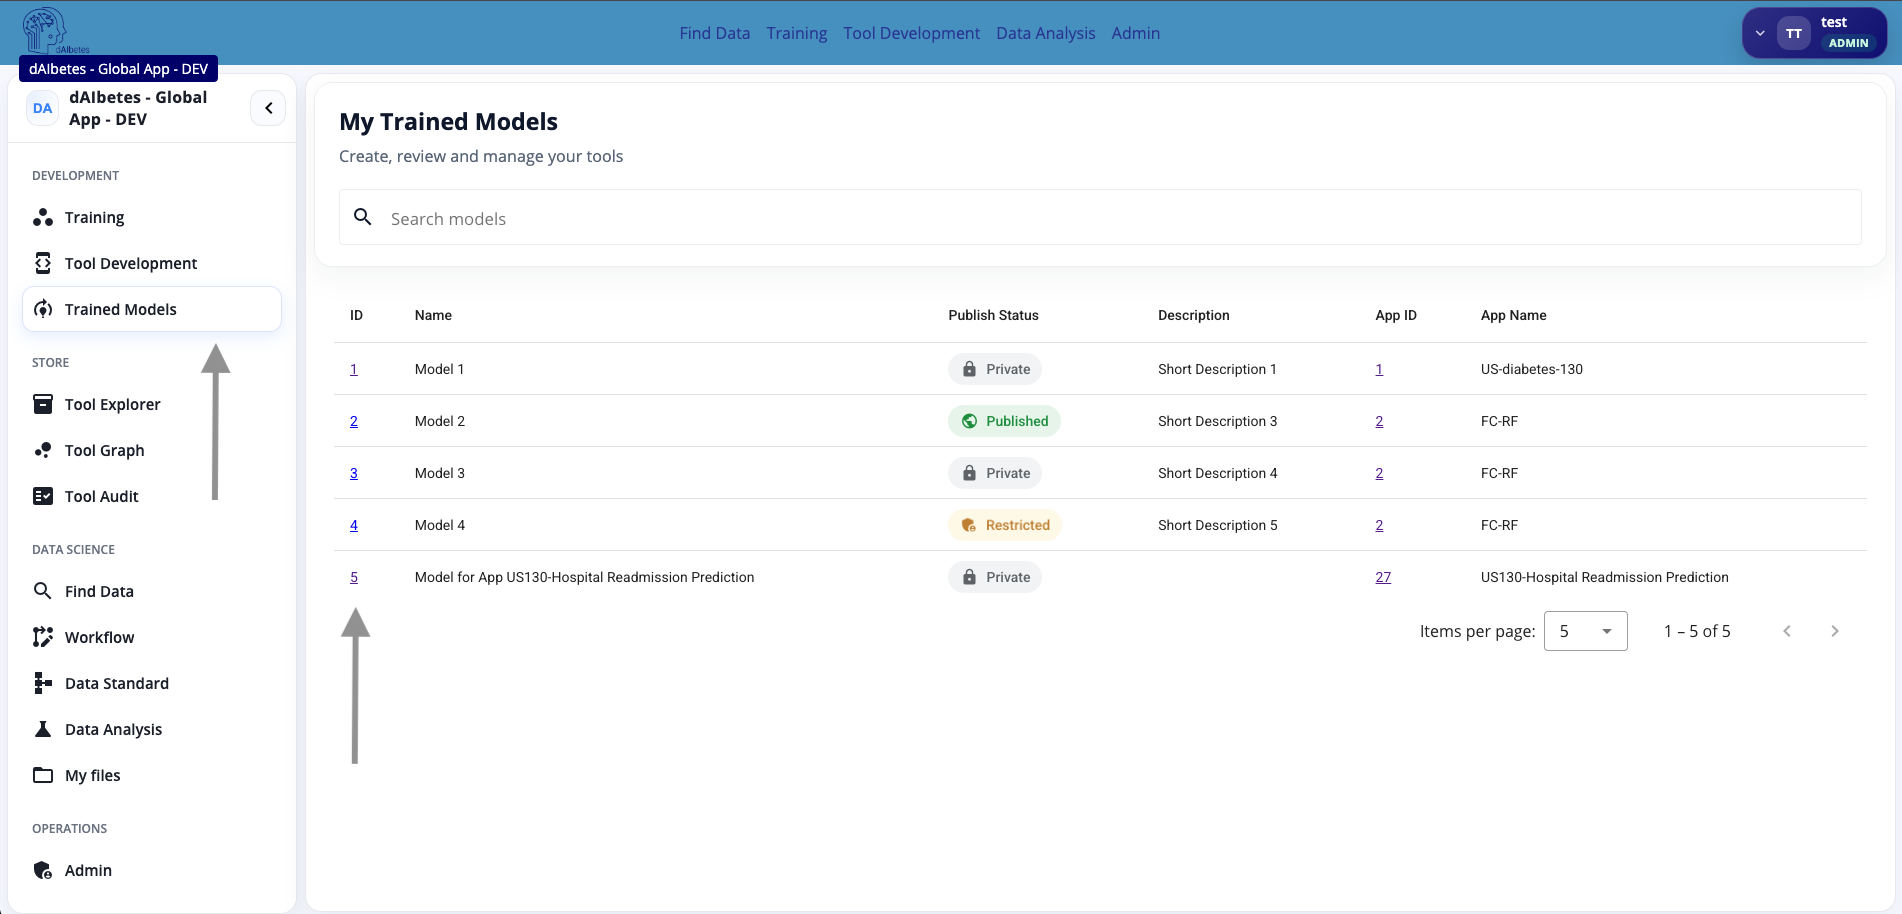
The trained model registry lists all models you can access.
| Column | Meaning |
|---|---|
| ID | Internal model identifier |
| Name | Human-readable model name |
| Publish Status | Current visibility state |
| Description | Short model description |
| App ID | App from which the model was created |
| App Name | Name of the app associated with the model |
Click the model ID or name to open the model detail page.
The trained model registry separates reusable model assets from individual training runs. A run is an experiment execution; a trained model is a managed artifact that can be reused.
Use the trained model registry when you want to find, review, publish, restrict, or reuse a trained model after a successful federated training run.
Step 8 — Review the Trained Model Detail Page
The trained model detail page shows the model metadata, version, latest changes, and access-related tabs.
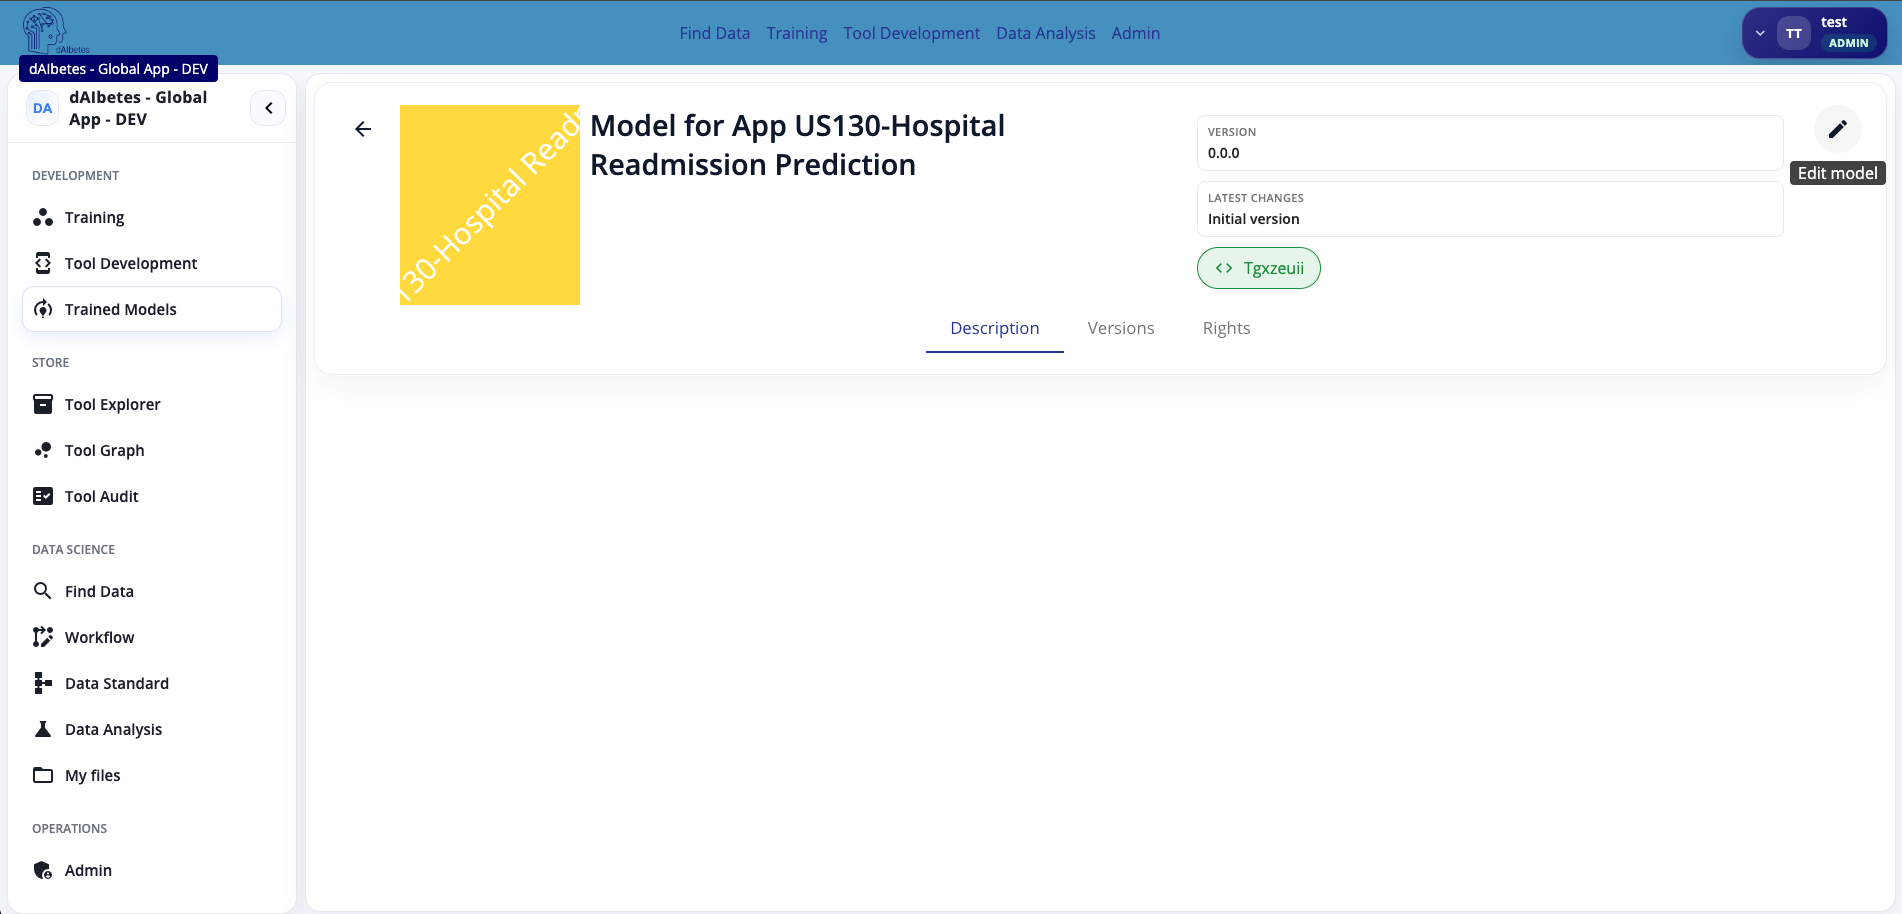
The page contains:
| Area | Description |
|---|---|
| Header | Model name, associated app image, current version, latest changes, and model identifier |
| Description | Editable model metadata and longer model explanation |
| Versions | Available trained model versions and variants |
| Rights | Access and permission settings |
| Edit model | Allows updating the model description, status, and metadata |
Use this page to confirm that the trained model is correctly registered and that its visibility matches the intended usage.
A trained model can remain private, be restricted to selected users or groups, or be published depending on the platform policy and project governance.
After creating a trained model, verify both the technical artifact and the governance metadata: version, description, publication status, and access rights.
Summary
In this walkthrough, you reviewed the results of a completed federated training run.
The workflow was:
- Open the completed run.
- Request local metrics from participating clinics.
- Wait for local approval of metric sharing.
- Review per-clinic and aggregated metrics.
- Inspect the generated training result artifact.
- Start a model build pipeline.
- Review pipeline logs, validation status, and produced model image.
- Open the trained model registry once the model should be reused.
The key idea is that training results move through multiple levels of control. Metrics are shared only after clinic approval. Model artifacts are generated by the run. A build pipeline then validates and packages those artifacts into a reusable model variant.